Pages

Wednesday, November 7, 2012

Nuts

Finished the tap, I didn't even harden the cutter, I was so excited to try it out. It worked pretty well for the first go around. I do want to deepen the cheep removal flute and work in a different wood for the nut, but I'd rate the attempt as a win.

The long grain cut very well, but the side grain didn't cut as well. Still looks completely serviceable though. This leads me to believe that the commercial versions are cut with a rotary cutter or CNC machine. Which is where I'll be directing my focus next.

Detail of cutter and clamping mechanism. it's a 3/8-16NC bolt cut down and slotted.

Overall tap.


And the jig nut, I was skeptical about using aluminum plate for the strips, but they worked just fine.


Wednesday, October 31, 2012

Wooden Vise Screws

Big wooden screws have always been something I've wanted to make. I'm finally getting a start on some of the tooling for the project. 


Overview of a slew of threadcutting things. And a kitchen knife in the "to sharpen" pile. 


 First object is an old hand screwbox, you can tell it's old because the screws are square ended. The tap isn't a match so I'll probably steal the cutter from this piece and use it in a dedicated one built for that tap.


Here is the tap I'm in the process of making for bench screws, also notice the failed soft maple nut blank in the back. The kerf is not nearly as irregular as the picture makes it appear, but I'm hoping the irregularity you do see isn't a big deal. Unfortunately Ze won't know how well (poorly?) that works until I've finished the tap, made the nut and put the whole shebang together. Cross your fingers.

Second thing I want to talk about in this photo, the nut blank. Have you ever used an expansion bit in a brace, in soft maple? It's hard. The bit started moving around and the hole shape has been getting more and more erratic. I just bought two forstner bits for the major and minor diameters and will redo the "die" and nut blanks.


If the tap doesn't work out, I've started working on a change gear operated screw cutting machine. It's virtually the same as a metal lathe, only the toolpost will hold a router traversed with a hand cranked leadscrew. It's a significant investment, and would probably mean I get into the big wooden vise game, but I could also do any variety of screws, I'd love to make large 4" diameter 1 TPI cider press screws and other large screws. I wonder if the other screw guys got into it this way? 


Here is the picture of the screw, I'm intending to make. There may not be a post on this for a while, I should really get back to the side tables, the chairs or any one of several other things I've already physically started.

Monday, October 22, 2012

Mucking about in Hyperspace

Not all of us have a Heart of Gold, so sometimes when a problem presents itself, we just have to grumble (thank my puppy for that) and keep bashing our head against a wall until we get it or pass out.

Yesterday I reinstalled SketchUp and attempted to figure out why a certain group of plugins wouldn't load. It was pretty annoying, but I eventually figured out I was missing a whole bunch of other files that allowed the others to work.


Now I can make lofts and fillets with remarkable ease. 


Here's what I wanted to model, well the handle anyway. It's from the esteemed George Wilson, he does amazing things, I hope one day to be a fraction of the craftsman this guy is, and every bit as tool pig.


Here is my work, it's getting there. I still need to figure out how to manipulate the profile it lofts with so I can make it form tangencies where I want and the right shapes over the loft. But it's a start. I;m hoping it's easier to figure out, otherwise I'm going to ditch a program I'd love to use for PencilPaper, a program I'm really good at.


Here is the first project, three jaw pin vises in bloodwood and padauk, chucks from Lee Valley and brass ferrules cut from 1/2" tubing. I'm trying to really get on top of this idea I had, when I go to make a tool, make two and list one in the Shop.


 One is all fit up and for sale, the other needs a little more work to get together.


Here is the other part of the project, a seven piece miniature nut driver set and a 10 piece needle file set. I'm particularly excited for the needle files. Maybe I'll do them in Cuban Mahogany? Thoughts?

Sunday, August 26, 2012

The Planemaker's Workshop

Today I ran into exactly the kind of thing that makes me interested in planemaking, I'm building rather large bookcases into the main room of one of my co-worker's houses, everything is pretty much done except for the final paint, and one piece of moulding on the top of the baseboard. I tried a few different things, but short of buying a moulding head for the tablesaw and grinding custom knives there's no way for me to make this profile accurately with power tools.

So I met with my clients and we all agreed that it would be best to wait until I've got my hollows and rounds finished so that an accurate reproduction can be made. Until I finish the four or so planes I need to make this moulding, consider me a full part-time planemaker. 


Layout phase for the roughed out blanks, in this case done while watching Law and Order (favorite all time cop show). Bed, breast, mouth, mortice, sole width and wedge lead are drawn on in all necessary places.  

 Two pitch boards for layout of plane length, pitch and in some cases escapement. There's also a wedge template, used for checking an in-progress mortice as well as laying out finials. I use one Tablesaw/shooting jig to cut all wedges so there is never variation. 

On SMC I posted a little writeup on the remanufacture of this once warped and ironless Summers Varvill #6 Round into a #6 hollow for my quarter set.

Blind side. 

 Sole


This is my layout block for sawing bed and breast angles, I hate it, works fine, but I've realised that Larry Williams' has a strip attached to the bottom overhanging both sides, so it can be flipped to any orientation for sawing. I need to rip it off and attach a steel or brass sole to it. 

Time to get off my ass and get back to work. I have a lot of mouths to feed.

Wednesday, August 22, 2012

Finished V-Plane

Late last night, I finished sharpening and tuning the V-Plane I wrote about last time. I was too dark to get good photos though so I had to wait until now.

 Vintage iron salvaged from a beat up 7/8" skew rabbet. 

 Looking for fairly even projection here,  it looks massive, the majority of this is due to the mouth geometry, the arris of the iron is really tight, but the farther the two edge get from the point the bigger the mouth. That's okay, this plane is for hogging wood out of a moulding.

 Sample cut, this plane is awesome, it hugs a gauge line and starts a profile similar to a snipes bill, but with a much easier to sharpen iron. Only downside is control over the fillet, it will be 45 degrees, depending on the moulding that may not matter or it might even be preferable.

As a side note, Mouldings in Practice was an awesome book. I read it in one sitting the moment it arrived. Now I need to build a proper sticking board, grind and iron for a number 6 hollow I re-manufactured, and finish some other planes I'm building to work on some picture frames. Stay tuned.

Friday, August 10, 2012

V-Plane

I have one piece of QS black birch, rendered for the purposes of testing it as a planewoood and comparing it to beech which I've used previously. I labored over which plane to make out of this, I debated first about making a pair of small hollow and rounds which seemed like a waste for my only piece of material. Next idea was a rabbet of some sort, first straight, then skewed with a nicker. That did it for a while but I wanted still something more interesting. Then I saw a v-plane in Whelan's The Wooden Plane, and I knew that was it.

The downside is I've only been able to find four references to vee planes, one is a plow by D.L. Barrett and Sons, one was in Whelan (a side escapement), one was in an online auction with a rabbet escamepent, and the last was another v plow referenced in passing in the 1990 May/June issue of American Woodworker in an article on molding planes by Mike Dunbar, page 51 as a method of wasting large amounts of wood from a cornice profile to be finished with hollow and rounds.

 It's slightly harder than both beech and yellow birch, species used in commercial American make planes for centuries. Like beech is has the uniformity between early and latewood called diffuse porous that allows all parts of the wood to move according to humidity, making it very stable.


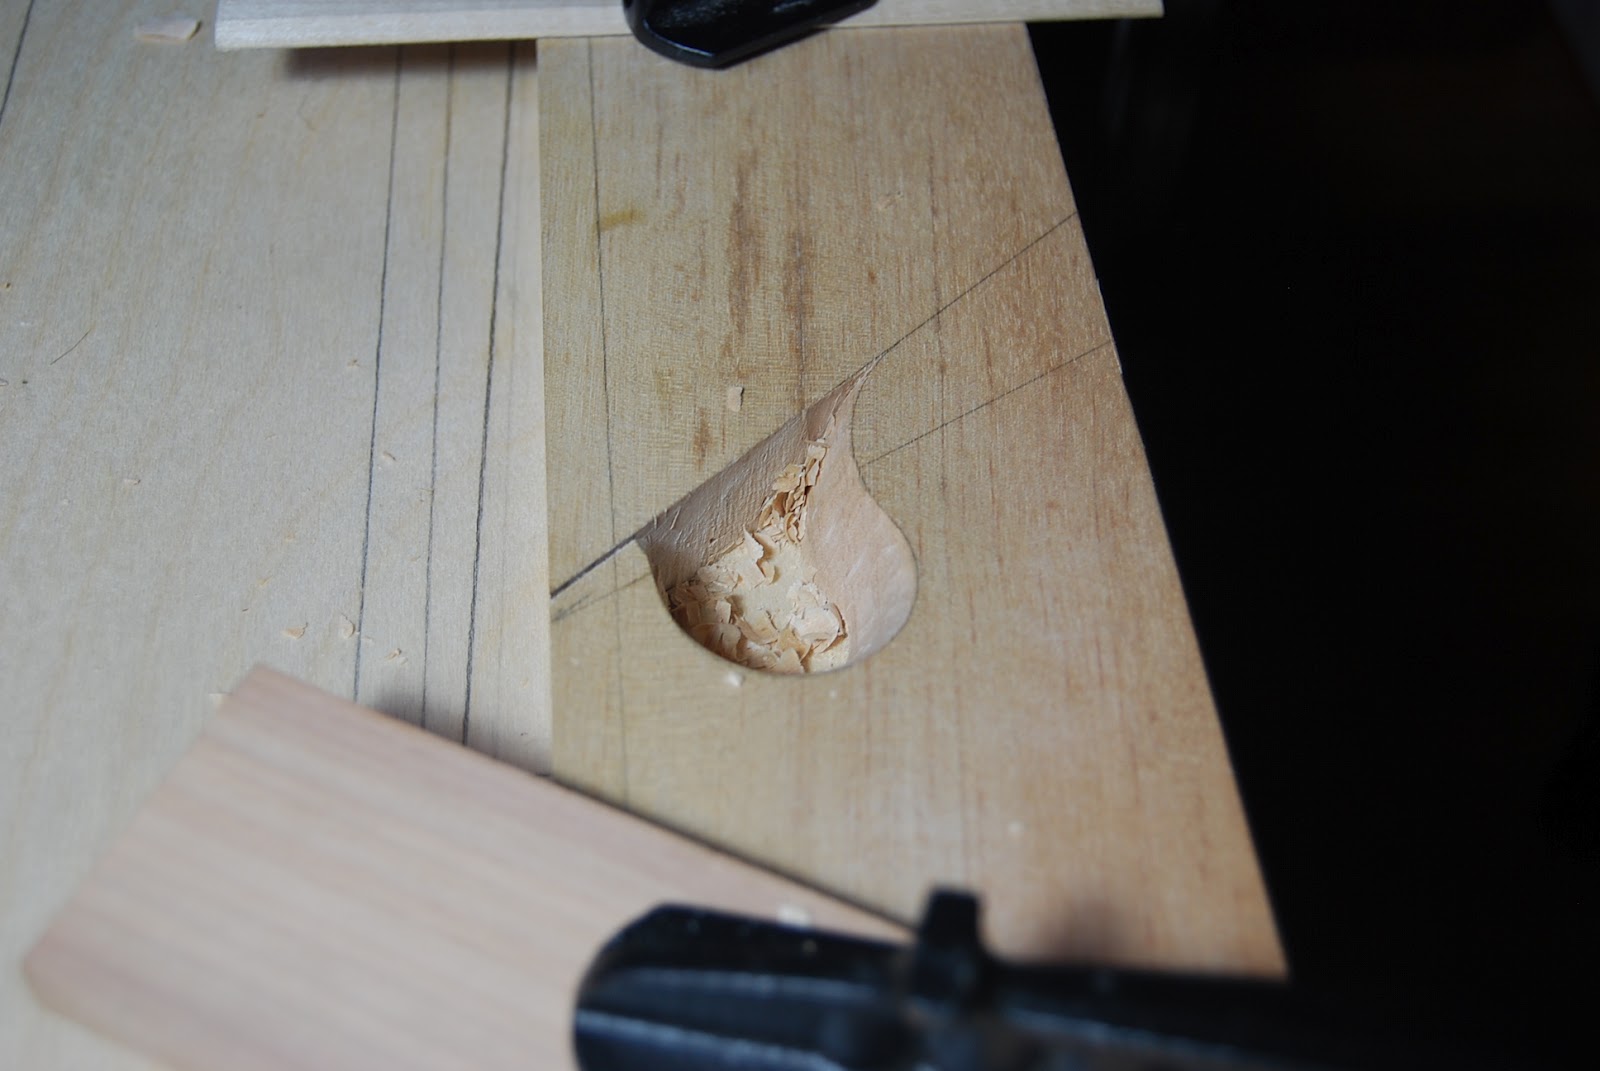
 Big, then small gouges and sandpaper wrapped dowels are used to carve the conical escapement, I was a bit dubious about this from some rabbet escapements I have, and have seen. After drafting it several times, attempting to get the proportions right I bored out the bulk with a brace and set to carving.


It's a subtle and sexy piece of complex geometry, a conical ogee. Mine isn't without a blemish or two but my initial dislike of the escapement has totally changed after rendering it.  


 The birch has been pleasant to work with and beautiful besides. the texture is very fine, not flashy like QS beech, and with more subtlety in color. I'm hoping I can get a lot more of it and start that plane making business!

Friday, July 27, 2012

Anticipation for Mouldings in Practice

If you're reading this, I think I know a few things about you. First, you're into hand tools, maybe exclusively, maybe not, but you like them. Second you're familiar with Lost Art Press, and you know who Matt Bickford is. Lastly you might be wondering what sort of anticipation I have that makes itself worthy of an entire blog post. It's planes of course!

 Staged for profile/iron assessment, marking and sharpening if they are close.


Somebody did some funkiness to this #5 Round. This iron is headed to the grinder.


Tuned up a a sash ovolo plane and now it's cutting pretty well.


And I also got a pair of #12s working fairly well, they still a little fat on one side but produced this cove and fillet pretty well. I found some holes in my sharpening needs for these shapes, I'm hoping Mouldings in Practice will help me find a good set of tools for fixing that.

Getting a bit closer on that pair of #8s I started a while ago. Iron blanks are on the way.

Monday, July 9, 2012

More Lap Desk Work

Finally back home now, I got to work installing the hinges and attempted a monogram carving in the lid, I'm happy with how it came out, but need to order some other carving tools to make the process a little easier. I could only find some #3 by 1/2 inch screws for the lid hinge leaves, now I have to nip and file them down to fit.

I also got materials to solder up the hasp, but I'm still working on the design. In the hasp drawing I think it's a bit too wide, and perhaps the slot is too far down.


Wednesday, June 27, 2012

Pine Lap Desk

I've begun work on a small lap desk out of pine. Because of my lack of space (I'd love to build a nice writing desk with drawers and pigeon holes) the best solution seemed to be repurpose myself into a desk with a few pieces of wood. I originally looked at Christian Becksvoort's article in Fine Woodworking, but made several modifications... It has no inkwell drawer, while I admire the interesting construction involved with his drawer stop, it's overly complex and I don't like it. Furthur, I don't plan on using dip ink anytime soon (not that I haven't, used to take class notes with a dip pen). I also adjusted the dimensions to a certain style of notebook I like and made a compartment for writing supplies.


The dovetail layout for this piece was a bit tricky. I had chosen the slope of the top beforehand at an angle that felt comfortable for an work surface on the lap, this means that the likelihood of having a layout match up, front to back, was pretty low. after some fuddling, I got pretty close, but on the second one I plan to define the slope based on tail multiples rather than a given angle. Cutting them is a cakewalk, it took me all of one and a half hours, considering I hadn't cut a dovetail in months that is pretty good for me.
 

 Mock-up with the lid on, I still need to acquire some QS Easter White Pine for the bottom.
 

Overhead shot showing the dadoed divider.


This is the part I'm most proud of, the breadboard lid. All the stock in this project is 3/8" thick, so the breadboard tenon is 1/8" thick by 3/8" long and the breadboard itself is 1 1/8" wide. I'm really happy how it turned out. The breadboards themselves are QS sycamore that I got from a fallen tree in a park right up the street. I slabbed some of it and this is the first bit I've gotten to use! 

Thursday, June 7, 2012

Kitchen Table Progress, Finally

 I may have titled this post, Thank God for Motivation, or Visit PFW and You'll Get Things Done, but they aren't as immediately descriptive. Today started by finishing my "work season" in the morning, I took a walk to the Philadelphia Furniture Workshop to say hello and drop off some custom machined centering points. While I was there Mario Rodriguez asked how my table turned out, if you recall months ago I went over for some direction on pleasing leg shapes and turning. I hadn't done very much, and his comments spurred me into action. I put in a ton of hours in the last two days and now it's starting to look like something.   
Drawboring a Short Side
Mockup, little more legroom needed so off to cut corbels into the long sides and start finishing.
Currently it's got a coat of primer on the base and a 50/50 BLO/Turpentine prime on the top. The final coat of paint will be a dark slate, the top will get another wash of the 50/50 then one or two coats of BLO.

Thursday, May 10, 2012

Second Kumiko Panel

Here is today's work on another more thoroughly planned piece.


This shows my layout drawing and some of the different stock pieces I used for the panel (jigumi), I plan to do the leaf pattern (asa no ha) in a darker wood for contrast, maybe cherry or walnut.
 

Two pairing jigs, I now realize I need one at 22.5 degrees to to most of the leaf pattern. So I must finish that before work continues.

Wednesday, May 9, 2012

Kumiko Work


New tool arrived! Had to start putting it to work. Wood is Port Orford Cypress, which smells wonderful. I have more strips to thickness now, before starting to fit the internal pieces. I'm very happy with the fits so far, some careful layour and cutting on the miter box makes for really easy work once the prep is done.

My layout was a little tedious, to continue I think I need a fixture with interchangeable sawing guides for square and triangular cuts and of different pitches.  

Friday, March 23, 2012

Consumerism

You may have guessed that I loath consumerism. As a person that "does" things for himself, from homemade butter, bread, veggies, building most of my furniture, I usually abhor marketers and peddlers attempting to sucker people in.


However when a certain beloved tool manufacturer puts up a free shipping deal around tax return season (coincidence? methinks not), who could look upon their shopping cart and not buy the plane one has been wanting-for since it's release? Certainly not this guy. I caved and set myself up.

I plan to give customer service a call to thank them, and inquire about acquiring a second fence, so that I can swap fences rather than applied wooden fences. That seems potentially easier, though maybe wood fences with threaded inserts and machine screws would work as well.
On happy accidents... I found that with a heavier cut one can produce spills with the Veritas Skew Rabbet (Veritas Moving Fillister). I don't think they are as tight as a dedicated spill plane, but I'll be able to get a feel for them before I build one.

Sunday, March 18, 2012

Table and Stick Chair Progress

Here's some more on the two projects that will inhabit my kitchen in the near future. First up the chair seat.


Lines drawn in a grid on the surface help me to visualize the compound curves of the seat. I do this with all sorts of shapes to illustrate form to my students too. Try it, it's surprising how much more informative a surface becomes with simple lines on it.


This photo shows the centerline particularly well, and with it, the basic contour of the seat. I've done most of the scraping, but there is still sanding to do. After a coat of primer, I'm sure to find high spots that I've missed and I'll need to do some more carving and sanding.

Here is one of the legs, primed and painted with the undercoat. I couldn't wait to see how the paint showed up. Right now I'm laboring through the morti, 8 2" deep 4" long and 1/2" wide holes are big, I'm just using a huge mortising chisel, instead of boring and paring.