Pages

Wednesday, October 20, 2010

Gramercy Tools 12" Rip Carcass Saw Build

I found someone on eBay selling a Gramercy Tools 12" carcass saw kit, I bought it. After testing one at my dovetail class I was sold. 

Tote cut, and the slots cut for the plate and spine. 

 Shaping the tote, on a refinished bench, I just added a layer of plywood and a brace to prevent sagging.


Put together, shaped and just a little left to finish.


Great tracking, and the build only took about an hour. Now I've got a new saw! It's going to come in handy for a new project I've got cooking. 

Sunday, October 17, 2010

Dovetail Class at PFW

I went to school at Philadelphia University, and I now teach at Philadelphia University...little did I know that not 1 mile around the corner from campus lay the Philadelphia Furniture Workshop, run by Mario Rodriguez, and Alan Turner. This past weekend I got some help on my dovetails, all I can say is that PFW is a great school and their style and teaching methods are great. Here are some photos from the class.


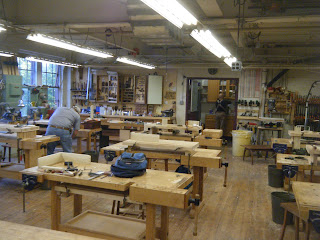
Here's a shot of the teaching space, benches with Record vises and bench on benches. I got to use all kinds of new tools, the Gramercy Dovetail Saw , Veritas Dovetail Saw, and the Lie-Neilsen Dovetail Saw. I also used Shapton water stones, which were pretty cool. They out a great edge on chisels and plane irons really fast. I do have to say though, my favorite tool of the whole class was the Gramercy 12" Carcass saw... I fell in love with it. I need to have one. I have a commission coming up so I think I'll spring for it. I also loved the LN bronze No. 2 plane...super sweet.


Here's a shot of my space, I had to build a few tools, including a cutting gage, a marking knife a fret saw, and some chisel and plane rehabs.


Here's my first set of through dovetails, I have a bit of a gap, but I'm otherwise very happy with how they came out.


And here's the set of blind dovetails, we cut today. I had a chisel slip on the left side, and my houndstooth baseline is a little rough. I'm still happy with them.

I also left with a Starret double square...I love this tool too.

Wednesday, October 6, 2010

Making a Butter Mould

One of my other passions is eating good food. I define good food as organic, mostly raw, free range, and entirely homemade, even the little details. In preparation for Thanksgiving I'm making a butter mould to make individual pats of butter that I'll make from scratch.  


Butter molds, at least the round ones are simple, only three pieces. I haven't done research into buter mold makers or what they call the different parts so I'll make it up as I go along. First I turned the Bell that's the cup looking part. It's 2" in diameter and 1 1/2" high. The cavity is 1 1/8" deep and tapers from the wide end to a square shoulder, there is also a 1/2" through hole in it's center. The Press has the impression in it. and tapers for a close fit around it's molding edge. Lastly there is a Plunger which is used to press the Press and butter mold out of the Bell. There is a blind hole in the Press to register the Plunger. On a traditional butter mould, I think the Plunger would be longer and it is threaded into the Press.

The Bell and Press are turned from sugar maple, the Plunger from cherry.   


I had a staggering amount of ideas for what to carve into the Press, I went with a pentagram, which is a symbol of nature, the elements, and also found on an antique butter mold I didn't buy. I think the mold is too plain, and plan to turn a ring around the outside of the pentagram when it dries.


Here are the finished pats of butter, it took some experimenting, and reading of arcane butter moulding passages to learn that slightly chilled butter and moulds primed in ice water make removal about 1,000,000Xs easier.  I still have to figure out a method of packing that reduces air gaps.

Saturday, October 2, 2010

Etsy Store Finally Running!

So I've been a member of Etsy (a Handcrafted ebay pretty much) for a number of years now, I've had some things for sale, completed some Alchemy listings (where you bid to make buyers projects), but mostly let it sit empty. Well not anymore. I listed some of the bottle stoppers I was working on a few posts ago. I'm far from a fully stocked shop, but this is as good as I've gotten for a long time.

So please hop on over via The Link and take a look at my "for sale" work. Maybe even buy something? Thanks for looking.

Friday, October 1, 2010

2,000 Pageviews, wow.

I wanted to say thank you to everyone following, browsing or mistakenly accessing my blog. I've been having a good time writing on it; met some very good people and learned a lot. I've got a lot more going on soon which I can't wait to post about.

Thanks for reading,
Trevor Walsh